4
Commands

  • Remember, mongoDB is case sensitive.
  • You can view the databases by the command

>show dbs


  • So we can see we have these many available databases along with their corresponding sizes.
  • If I want to switch to some other database, then we can use the command
>use database_name

  • The good thing about mongoDB is that you don’t have to explicitly create any database as we used to do in SQL.


  • If you want to see the current database, then use the command
 >db


Turning on the server

  • Its time to start the server
  • Go inside the bin folder and double click the mongod.exe file.
  • It will start the mongoDB server.


  • It will look something like this:-


  • Now click the mongo.exe file to open the mongo client shell.


  • The mongo client shell will look like this :-


  • Note: - Always first run the mongo server then start the mongo client shell, if you do reverse, then mongo client shell will not start.

  • Sometimes the mongoDB shell doesnt start. So we can try using 
mongod --repair


2
 Installing mongoDB on windows...


  • After unzipping the downloaded mongoDB file, the you will get the following:


  • When you go inside it, the bin folder contains all the executable.


  • You can put the folder “mongoDB” at anyplace wherever you want, but in local disc c, is suggested by mongoDB documentation.
  • Now, Create a new folder “data” at the same location where, mongoDB folder is present (here, it is local disc c).


  • Inside this folder, create another folder called “db”.


  • This is the place where the data from mongoDB instance is going to stay.


INTRODUCTION

  • MongoDB is an open source, document-oriented database designed to provide high performace, high availability & high scalibility. 
  • Instead of storing the data in tables and rows as we do with a relational database, in MongoDB we use JSON-like documents with dynamic schemas to form and manipulate data.
  • It is a very new technology and developed in 2009 but it is achieving active development since it was formed.
  • NoSQL databases are in considerations of the web developers and mongoDB is one of them.


5 Generating the EMULATOR...


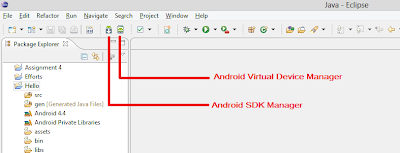
  • There will two icons available named, “Android Virtual Device Manager” and “Android SDK Manager” as shown below.


  • Click on Android Virtual Device Manager.
    Now we need visible platform, on which we can run our Android  apk files. So, for that we will generate an EMULATOR which is nothing but some smartphone like Nexus 7.And when we will run some Android program, we will see the output on the screen of this EMULATOR.
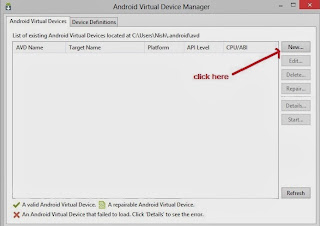
  • So, the following window will pop-up.


  • Click on "New" to open the following window.


  • The selection of Device is basically depends on the processor speed. If your processor is struggling in setting up the emulator of Nexus 7 or some other higher device, then go for so lower version. In the end you just have to implement Android irrespective of the device you have chosen.
  • Keep the RAM less around 512.
  • Now, after that, you will be back to the previous window.
  • Select your device, and click start. As shown below:-


  • After that, click "Launch" in the following window.


  • Then you will see the following windows:-


  • So, your EMULATOR is now running.


4 Download Android ADT...


  • Download Android ADT by clicking on the following link 
  • Now, look for the heading, “Download the ADT Plugin”
  • Copy the link as shown above and open Eclipse.
  • Now, click on HELP and then go to Install New Software.

  • The following window will pop up and copy that link into the text box of this window.


  • After clicking ADD, an “Add Repository”  window will pop up. Just type some name and paste the link again, in the Location text field.


  • Click OK.
  • After some pending, you will see the following:-
           

  • Check “Developer Tools” and "NDK plugins" option and hit NEXT.
  • After completion, click next again in the following window.
 

  • Then following window will pop-up

  • You will see the following window

  • So, you will have to restart Eclipse. And when you restart it, you have to set the path of your SDK folder. Because it will ask you for that. If it doesn’t ask, then you can do it manually also, by going to Windows>Preferences> 


  • After clicking the ANDROID tab as shown above, just click on browse and set the location of SDK.


 3 Download SDK...
    
  • After downloading, Open the folder and click the “SDK Manager” icon.

  • In the SDK Manager window, check all the packages and install them. It may take some time but it happens.


2 Download Eclipse IDE...
  • Download Eclipse IDE (Integrated Development Environment) which makes the development of programs a lot easier.
  • And you will see this image


  • Download the option "Eclipse IDE for JAVA Developers" along with selecting the OS and the type of OS (32-bit or 64-bit).
  • After this, install eclipse in your computer. 


1 Download Java....

  • Click on the normal JAVA icon  (JDK)7u45. You can see more  latest versions.
  • You may see something like this inside the window:-

  • After clicking it, just accept the license agreement. (If you have some free time, read the agreement). Just below it, you will get a list of operating systems, so select your operating system and download the software.